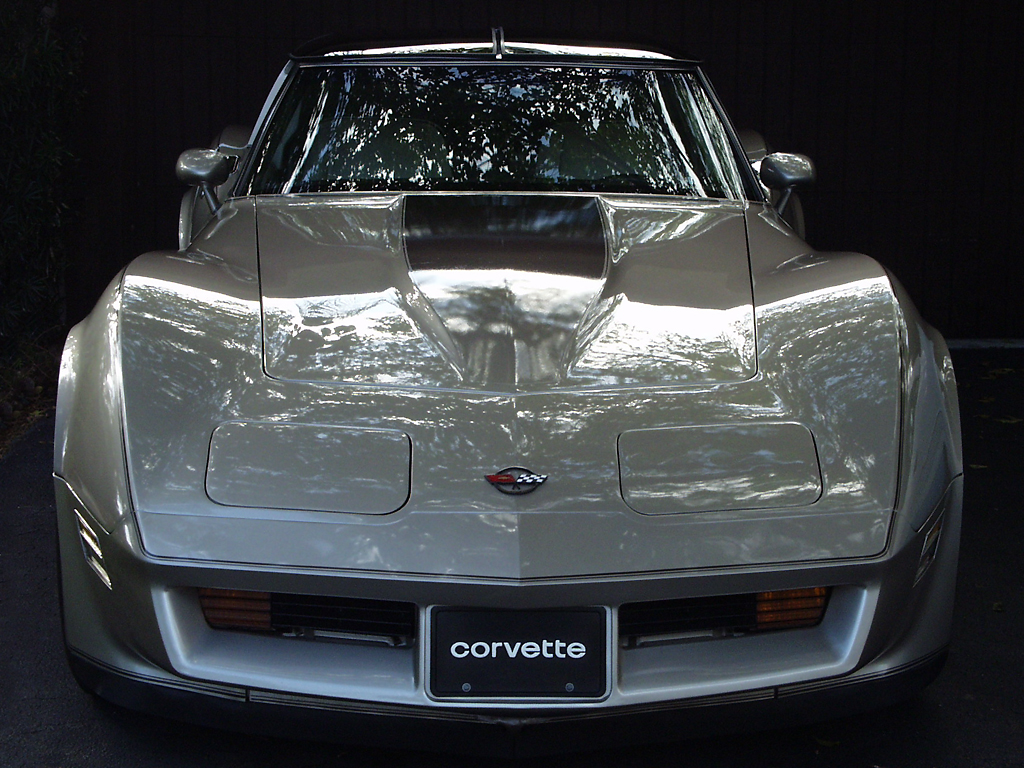
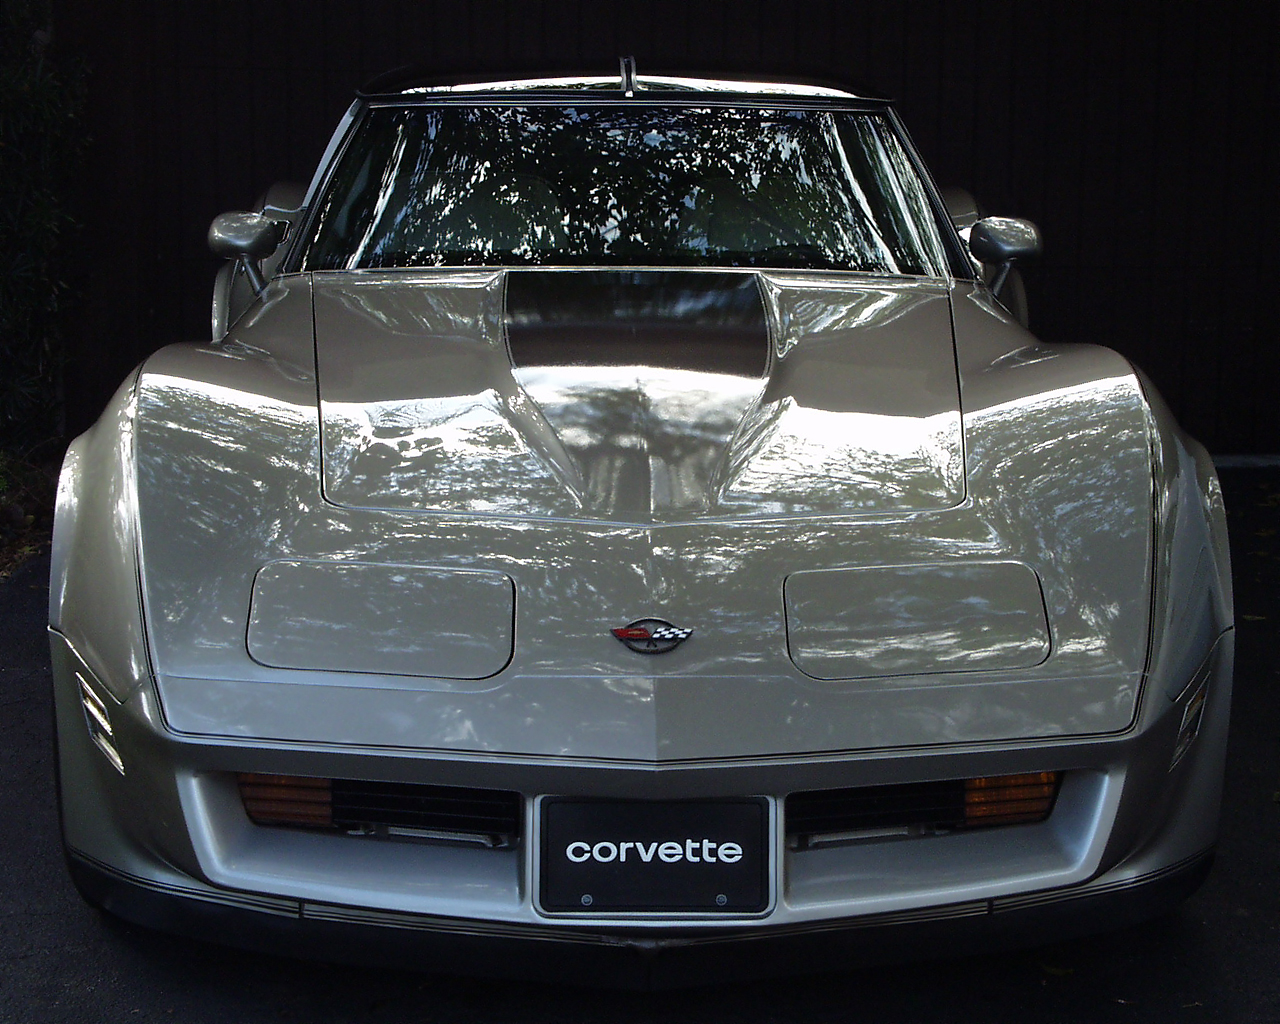
Noel Carboni's 1982 Collector Edition Corvette
![[Noel's 1982 Collector Edition; Click To See Prints for Sale]](images/VetteBlueSkySmall.jpg)
|
Here you will find the documentation of modifications to my 1982 Street Machine.
Don't forget to click on the underlined links in the text!
|
|
Here you will find the documentation of modifications to my 1982 Street Machine.
Don't forget to click on the underlined links in the text!
![[Underhood; Click to See a Larger Image]](images/Underhood.jpg)
On top is a F.I.R.S.T. (Fuel Injection Research System Technology) TPI system, which sports a big single vane throttle body and large runners. This replaced the TBI (Throttle Body Injection) system originally shipped with the car. The F.I.R.S.T. TPI system is rated to flow enough fuel/air for 450 HP. Unfortunately, the manufacturer (IMPCO aka AirSensors) appears to have gone out of business. I wonder where I'll get my next mass-airflow sensor. Perhaps a failure will be the excuse I'll need to get an Accel SuperRam intake with DFI controller...
![[Underhood Drivers Side; Click to See a Larger Image]](images/Underhood2.jpg) The TPI has its own computer, nestled in the
glovebox, which provides buttons to select parameters and a knob to adjust
them. Tweaking this thing turns out to be a fun way to pass the time at
stoplights, with the runs between serving as tests.
The TPI has its own computer, nestled in the
glovebox, which provides buttons to select parameters and a knob to adjust
them. Tweaking this thing turns out to be a fun way to pass the time at
stoplights, with the runs between serving as tests.
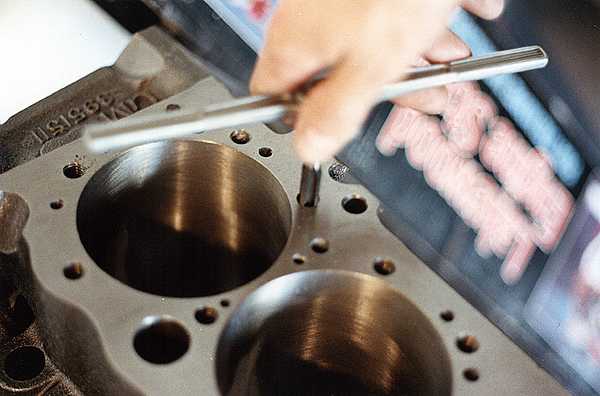
The existing GM ECM (Electronic Control Module, or "computer" by another name) still manages spark timing. I reverse-engineered the ECM tables from the ROM (Intel 2532 EPROM compatible pinout) and did a lot of seat of the pants testing to determine the optimum curves for avoiding detonation and for making Mustang drivers feel bad.
Dynomax 1-5/8" headers wrapped with Thermotec insulation carry the hot gasses out into a dual 2-1/2" exhaust and through 2 cats. The insulation saves a lot of wear and tear on engine compartment goodies, not to mention the hood paint. Contrary to some lore, the headers seem none the worse for wear so far. The exhaust passes exits through 2-chamber Flowmasters, for a fine sounding farewell.
The engine idles well (although a bit rough below 800 RPM) and pulls strongly from 1500 to 6000 RPM. It really kicks you in the pants at 3000 (smokes street tires in 1st AND 2nd gear)! This mandates a conservative approach to driving in the rain or in any traction-limited situation!
![[Noel's 1982 Collector Edition; Click To See Prints for Sale]](images/82CE_AtAFC_Small.jpg)
|
![[Long Shifter for Richmond 6 Speed; Click to See a Larger Image]](images/6SpeedShiftBall.jpg)
I bought a Doug Nash 5 speed, way back before Richmond Gear bought them out and began making their 6 speed. I put about 130,000 miles on the 5 speed, at first behind the 350, then later behind the 418. I rebuilt it once, then after a bunch of miles and breaking some teeth off of 1st gear, I finally decided to upgrade to a Richmond Gear 6 speed with overdrive!
![[Noel's 1982; Click to See a Larger Image]](images/NC82.jpg) I front-ended the Richmond 6 speed with a Centerforce dual friction clutch
setup, a Lakewood blow-proof bellhousing to stash it in, and a bunch of
miscellaneous '80/'81 Corvette manual transmission application parts from GM.
Everything from changing the pedals to drilling a hole for the Z-bar stud on the
engine block to cutting a hole in the floor pan to increasing the length of the
drive shaft had to be dealt with.
I front-ended the Richmond 6 speed with a Centerforce dual friction clutch
setup, a Lakewood blow-proof bellhousing to stash it in, and a bunch of
miscellaneous '80/'81 Corvette manual transmission application parts from GM.
Everything from changing the pedals to drilling a hole for the Z-bar stud on the
engine block to cutting a hole in the floor pan to increasing the length of the
drive shaft had to be dealt with.
The stock '82 cross-member didn't fit my manual tranny application, so I got a late '70s part from a junkyard and modified the transmission mount. Since this cross-member has holes for exhaust pipes on each side (rather than a hump on one side) I had to spring for a custom-bent exhaust system (anybody ever notice that the word "custom" is gold-plated?). The list just goes on and on of big and little things that had to be done. What an exercise, BUT IT WAS WORTH IT!!! The Long shifter that comes mated with the 6 speed Richmond tranny is a pleasure to shift, the exhaust note is healthy, the tire smoke impresses the guy behind, etc. This is the way GM should have built these cars in the first place. Come to think of it, the late model 'Vettes have a lot of these attributes...
It seems the 1982 aluminum differential case just isn't up to the kind of torque I'm pumping through it. There will no doubt be a custom differential in my future. For now, I'm driving yet another rebuilt 1982 differential, and I guess I'll just have to be a little easier on it.
![[New Rear Spindle Assembly; Click to See a Larger Image]](images/RearSpindleAssy.jpg) If my differential woes weren't enough, I've also managed to break both my left
and right rear spindles. Isn't torque wonderful? Actually, parts selection had
something to do with this. A few years ago I purchased a set of offset trailing
arms, complete with spindle assemblies, from Van Steel. I swapped out my stock
GM rear wheel hardware, which was showing signs of wear after nearly 200,000
miles. Unfortunately, though I had asked for heavy duty parts, I apparently got
the "stock replacement" spindles. I have now replaced both spindle assemblies
with ultra heavy duty hardware from Vette Parts Online, and despite many hard
launches they're holding up perfectly.
If my differential woes weren't enough, I've also managed to break both my left
and right rear spindles. Isn't torque wonderful? Actually, parts selection had
something to do with this. A few years ago I purchased a set of offset trailing
arms, complete with spindle assemblies, from Van Steel. I swapped out my stock
GM rear wheel hardware, which was showing signs of wear after nearly 200,000
miles. Unfortunately, though I had asked for heavy duty parts, I apparently got
the "stock replacement" spindles. I have now replaced both spindle assemblies
with ultra heavy duty hardware from Vette Parts Online, and despite many hard
launches they're holding up perfectly.
![[Left Front Shot; Click to See a Larger Image]](images/82LeftFront.jpg) The good folks at Vette Brakes and Products, Inc.
keep my car from scraping on the road and going angular when I blast around
curves. They made me a 400 lb fiberglass rear spring to replace my Gymkhana
steel spring (to my chiropractor's chagrin). I installed a VB&P 3/4" rear
anti-sway bar and polyurethane bushings for the trailing arms, the spring end
links, sway-bar links, the camber arms, and all of the other squishy parts. I
originally put Koni shocks (adjusted to max stiffness) all around, but a broken
half-shaft U-joint mandated replacement rear shocks, so I'm now riding on
Carrera rears. Its a bit squeaky (due to the poly bushings), but boy does it
corner. I can enter a turn 20 MPH too fast and just go around it! I've left a
lot of other sports cars in the dust at on-ramps and the like, which usually
results in some puzzled expressions on them (and a feeling of joy in me) should
they ever catch up with me.
The good folks at Vette Brakes and Products, Inc.
keep my car from scraping on the road and going angular when I blast around
curves. They made me a 400 lb fiberglass rear spring to replace my Gymkhana
steel spring (to my chiropractor's chagrin). I installed a VB&P 3/4" rear
anti-sway bar and polyurethane bushings for the trailing arms, the spring end
links, sway-bar links, the camber arms, and all of the other squishy parts. I
originally put Koni shocks (adjusted to max stiffness) all around, but a broken
half-shaft U-joint mandated replacement rear shocks, so I'm now riding on
Carrera rears. Its a bit squeaky (due to the poly bushings), but boy does it
corner. I can enter a turn 20 MPH too fast and just go around it! I've left a
lot of other sports cars in the dust at on-ramps and the like, which usually
results in some puzzled expressions on them (and a feeling of joy in me) should
they ever catch up with me.
One thing I'm doing now is replacing my 550 lb front coils, A-arms, etc. with a VB&P transverse fiberglass monospring system. This should reduce the unsprung weight a good bit and improve handling over not-so-smooth surfaces, not to mention refresh my bushings.
I'm also reworking the stock steering with a Steeroids rack and pinion conversion kit. More coming on that. Watch this space!
![[New Vette Parts Brakes on the Back; Click to See a Larger Image]](images/RearCaliperInstalled.jpg)

For those of you considering carbon-metallic pads, one small warning: The friction characteristics change slightly as they get hotter (they grab more when hot). This isn't a problem when you learn to expect it, but please don't let it surprise you when you first put them in. Also, they DO make a LOT of black brake dust. They DON'T seem to wear very fast, nor have they done too much damage to my rotors.
![[BF Goodrich R1 Tire; Click to See a Larger Image]](images/BFGR1.jpg)
![[New 17 Inch Wheels; Click to See a Larger Image]](images/New17InchWheels.jpg) I have just purchased a set of polished aluminum Boyd Coddington 17" wheels onto
which I've mounted aggressive, low profile BFGoodrich gforce KDW tires.
Hopefully these will be nearly as sticky as the R1s, and maybe even more
responsive. The car is apart for suspension mods for the moment, so I haven't
mounted up the wheels yet. I did a bit of electronic image wizardry and came
up with the image you see on the left (pictures of the real thing coming soon). Do you
agree that 17" rims on a C3 look great?
I have just purchased a set of polished aluminum Boyd Coddington 17" wheels onto
which I've mounted aggressive, low profile BFGoodrich gforce KDW tires.
Hopefully these will be nearly as sticky as the R1s, and maybe even more
responsive. The car is apart for suspension mods for the moment, so I haven't
mounted up the wheels yet. I did a bit of electronic image wizardry and came
up with the image you see on the left (pictures of the real thing coming soon). Do you
agree that 17" rims on a C3 look great?
Rim sizes are 17" x 8" with 4" backspacing in the front, and 17" x 9.5" with 4.75" backspacing in back. The tires are 255-45ZR17 in front, 285-40ZR17 in back.
![[Cloth Seats for Collector Edition; Click to See a Larger Image]](images/ClothSeats.jpg) A nice ride has got to be nice to ride in. As shipped by GM, the Collector
Edition Corvette was outfitted with a very sharp interior. The door and seat
leather was a silvery color with successively darker shades in several panels.
Even with good care, however, over the years the leather seats degraded as this
car saw daily use. Plus, the Florida sun didn't help any, even though the car
sleeps its days away under a car cover or in the garage. At one point, the
leather in the driver's seat split open in several places, exposing the seat
foam. New, correctly appointed Collector Edition leather seats can be had from
several sources for the paltry sum of about $750.00 a pair, but I had an
alternative in mind... The leather seats were actually rather uncomfortable in
the sun, and I really didn't want to contribute to the demise of Elsie the cow's
family, so I special-ordered a set of custom multicolored cloth seats
from Dennis Hand of Corvette Originals in
Georgia. He charged me $250 per seat and took his time, but I think you'll
agree these seats are beautiful!
A nice ride has got to be nice to ride in. As shipped by GM, the Collector
Edition Corvette was outfitted with a very sharp interior. The door and seat
leather was a silvery color with successively darker shades in several panels.
Even with good care, however, over the years the leather seats degraded as this
car saw daily use. Plus, the Florida sun didn't help any, even though the car
sleeps its days away under a car cover or in the garage. At one point, the
leather in the driver's seat split open in several places, exposing the seat
foam. New, correctly appointed Collector Edition leather seats can be had from
several sources for the paltry sum of about $750.00 a pair, but I had an
alternative in mind... The leather seats were actually rather uncomfortable in
the sun, and I really didn't want to contribute to the demise of Elsie the cow's
family, so I special-ordered a set of custom multicolored cloth seats
from Dennis Hand of Corvette Originals in
Georgia. He charged me $250 per seat and took his time, but I think you'll
agree these seats are beautiful!
![[A Modest Sony; Click to See a Larger Image]](images/SonyOfMyOny.jpg) There is nothing like the symphony from a good V8, especially with those
Flowmasters under there, but sometimes a person just HAS to have some good
tunes. In this car it is especially important to have enough wattage to
actually be able to hear the stereo over the significant sound of the exhaust. I
am by no means an "audiophile" or "stereo expert", but I've wired up a dandy
little modest system that sounds simply fantastic! My original Delco ETR Stereo
Cassette gave up years ago with a litany of failures. At that time, I searched
for a stock replacement, but alas GM had sold its last unit just prior to my
need. Not knowing where I could get the Delco refurbed, I set out to replace
it. What I chose was a simple Sony AM/FM Cassette with a decent 22W per
channel power output. I tied this to an 80W per channel Radio Shack
equalizer/booster and some really good rear Pioneer big magnet speakers that I
picked up at a swap shop. Also in the mix is a Radio Shack 100W powered
subwoofer tube that I mounted in the cargo area. With a little tuning of the
equalizer and crossover, I've gotten this setup to sound as good as this car
runs, and with enough decibels to jam at major MPH with the windows open.
There is nothing like the symphony from a good V8, especially with those
Flowmasters under there, but sometimes a person just HAS to have some good
tunes. In this car it is especially important to have enough wattage to
actually be able to hear the stereo over the significant sound of the exhaust. I
am by no means an "audiophile" or "stereo expert", but I've wired up a dandy
little modest system that sounds simply fantastic! My original Delco ETR Stereo
Cassette gave up years ago with a litany of failures. At that time, I searched
for a stock replacement, but alas GM had sold its last unit just prior to my
need. Not knowing where I could get the Delco refurbed, I set out to replace
it. What I chose was a simple Sony AM/FM Cassette with a decent 22W per
channel power output. I tied this to an 80W per channel Radio Shack
equalizer/booster and some really good rear Pioneer big magnet speakers that I
picked up at a swap shop. Also in the mix is a Radio Shack 100W powered
subwoofer tube that I mounted in the cargo area. With a little tuning of the
equalizer and crossover, I've gotten this setup to sound as good as this car
runs, and with enough decibels to jam at major MPH with the windows open.
![[Front View; Click to See a Larger Image]](files/82CE800.jpg) What's a great looking car without great photos? As another of my interests is
photography, I have quite a few good images.
What's a great looking car without great photos? As another of my interests is
photography, I have quite a few good images.
New! Please click here to see the awesome Corvette photo prints I have for sale.
Want to put a high resolution version of the picture to the right on your Windows desktop? I've created multiple images in various common sizes. If you're using Internet Explorer, after clicking on the appropriate sized link below, right-click on the picture and choose "Set as Wallpaper". Note that these files are fairly large.
![[12.85 Second Time Slip; Click to See the Image Alone]](images/1285_111.gif)
I can describe every inch of the underside and inside (I'm talking cylinder walls) of my car, having rebuilt or built most of it myself. I drive it so much and have so much fun that I know where every limit is. This is what Corvette ownership is all about!
![[Click Here to Go to Noel's Digital Photography Pages]](images/DigiPhotoPageThumbnail.jpg) NCarboni@ProDigitalSoftware.com
NCarboni@ProDigitalSoftware.com
All Content Copyright © 1995-2010 Noel Carboni